After finishing a script, one might think it's time to start shooting. Simply handing the actors the script seems like the next step, right? Well, not quite. How do you determine which angles to use, what props are needed, and which characters are required on the day of shooting? This is achieved through a process called a script breakdown.
A script breakdown is a crucial part of pre-production, and while it can be somewhat tedious, moving forward without one isn't feasible. It helps identify all the production elements needed, create a shooting schedule, and work on the shot list with the Director of Photography (DP). Even if you're creating a no-budget short or a video in the classroom, having a script breakdown ensures everyone is prepared and aligned for the shoot dates. When the script is broken down, the crew will all be on the same page.
The great David Fincher once said, "People will say, 'Oh, but it's such a controlled atmosphere.' To me, that should be the goal. It should be as boring as possible for the people on set. You should have thought everything out so thoroughly that there are no surprises."
It's important to note that even when creating educational content, like a video tutorial or a scripted cooking video, breaking down a script to isolate what is needed is still beneficial. Many of these steps can be done by hand, but numerous software and online applications, such as Movie Magic, Studio Binder, Celtx, and Filmustage, can make this process a breeze.
In this example, we’ll use Studio Binder. However, the process and advice given today are generally applicable across other tools. These script breakdown applications will automatically break down the script, generate reports, and help quickly create a shooting schedule.
This task will likely fall into your hands for novice filmmakers and solo content creators. While there's nothing inherently wrong with doing this with a paper script and plotting the breakdown with a pencil next to the scene, after writing a great script and getting the gear ready to shoot, the last thing you want to do is spend hours, if not days, running through your script. The available software will make the job much easier and can likely point out things you may gloss over. As David Fincher said, it's about having no surprises on set.
Pro tip: Teaching video creation in the classroom? Script breakdowns are a great way to expose young creators and filmmakers to all aspects of the movie-making process!

Now, let's get into it and closely examine how to break this script down properly.
How to make a shooting script in four steps
1. Scene numbers
The first step is to ensure the script has numbered scenes. If you're using professional scriptwriting software like Final Draft or Celtx, there is a setting to number each scene automatically. Remember, a change in filming location dictates a new scene. This includes scenarios like filming inside a vehicle, the vehicle stopping, and then moving the camera outside.
%20(2).webp?width=600&height=308&name=image1%20(1)%20(2).webp)
2. Breaking the page into eighths
If you're working with a pencil and a physical script, the next goal is to break the page into eighths. In the film industry, it's common practice to assume that one page of a screenplay translates to roughly one minute of screen time. However, not all segments are created equal. Breaking the page into eighths allows for more precise estimates of how long each segment will take to film.
Take a look at this example from "Interstellar":
.webp?width=600&height=236&name=image2%20(2).webp)
Image via "Interstellar" screenplay by Christopher Nolan and Jonathan Nolan
This section is about 2/8ths of a page and about 15 seconds of screen time.
However, this section below is also roughly 2/8ths of a page, yet the screen time is nearly double.
%20(1).webp?width=600&height=300&name=image4%20(2)%20(1).webp)
Image via "Interstellar" screenplay by Christopher Nolan and Jonathan Nolan
Breaking the page down into eighths allows for greater preparation when facing these time discrepancies. Here’s a handy video tutorial on how to do this with a pencil or pen.
Video via Cinemanium
If using a script breakdown application, this process will be handled automatically once the script is imported. In the screenshot below, the number of eighths included in each segment can be seen.
%20(1).webp?width=600&height=156&name=image3%20(1)%20(1).webp)
The production process can proceed after the script is broken down into scenes and divided into eighths.
3. Scene elements
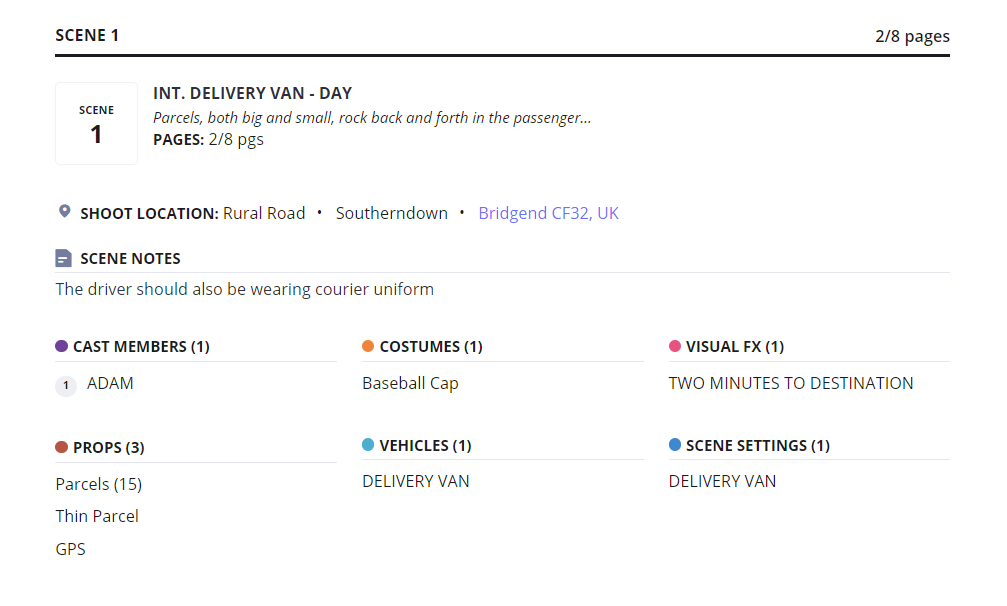
First, let’s look at scene one in the example script below to identify some of the production elements. These elements include anything that will appear on screen: props, cast, costumes, and even the location. Essentially, we want to prepare for anything that needs to be acquired for the shot to commence.
%20(2).webp?width=600&height=323&name=image6%20(1)%20(2).webp)
Right away, identify the props needed. If you're using paper, highlight these items to call attention. In software, simply double-click and select "props" — the program makes this incredibly easy. Regardless of which script breakdown software you choose, they all function similarly.
.webp?width=600&height=399&name=image5%20(2).webp) Given that the location is a delivery van, it would be wise to input around 15-20 in the QTY field. Of course, the van itself is an essential element, so double-click it and add it as a vehicle.
Given that the location is a delivery van, it would be wise to input around 15-20 in the QTY field. Of course, the van itself is an essential element, so double-click it and add it as a vehicle.
.webp?width=600&height=364&name=image8%20(1).webp)
We can see that this scene also involves a character currently named DRIVER. In narrative filmmaking, it's customary to leave a character unnamed until they are introduced by dialogue. As such, script breakdown software may find multiple names for this character. However, due to the intuitive nature of the software, the unnamed character can be tagged with the actual character name to identify who needs to be present, even if they haven't been formally named yet.
As the film's producers, we know this character is actually Adam. Therefore, we should click on cast members and tag all mentions of this character in the script so it applies across all the other scenes. Hit "add an element," and now "Adam" will be listed as a cast member in the elements drop-down list.
.webp?width=600&height=375&name=image7%20(1).webp)
Furthermore, there's a text call-out for a baseball hat in this example. This should be listed as a costume in your list. Additionally, consider the GPS as a prop. The "two minutes to destination" notification should be listed under visual effects, as it requires motion graphics.
With these elements noted, scene one should look like this. If doing this by hand, imagine various highlighter marks to indicate each element.

4. Scene report
With this information emphasized it can now be noted in a documented report detailing what is needed. This information can be generated using software within your screen report setting. From our first scene, we can see we need quite a few elements to get the scene rolling — no pun intended.
From script to camera
With the scene breakdown complete, the next step is to create a shot list from the scene. Again, there are two ways you can do this. If using pencil and paper, you can write on the script what type of shot you want for that specific dialogue length.

However, while this method is useful for shooting that particular sequence on the day, it can lead to a lot of thoughts and ideas being lost within the pages of the script. Therefore, having a larger documented overview using dedicated software is better. There are numerous shot list tools on the market, like Shotlister, Boords, and Shot Logic. Many of the script breakdown tools we mentioned also offer shot list features so that you might find an all-in-one solution.
For scene one, the imagined shots are:
- Close-up on parcels.
- Medium shot of the driver.
- Close-up of the GPS.
- Medium close-up of the driver turning up the radio knob.
The final shot list looks like this:

We now have two documented reports covering all the narrative and technical elements required to shoot this sequence.
As a side note, after creating your shot list, the next step in pre-production is to create a storyboard. This visual blueprint not only helps you determine the necessary angles and camera movement for your scene but also allows you to communicate your vision to the cast and crew effectively.
Storyboarding is an art in itself, and if you want to learn more, check out our detailed guide on storyboarding.
End scene
If you’ve stepped into the world of filmmaking, it’s likely because you want to flex your creative muscles or share something valuable with the world, whether it's a short film or an educational video. By following the steps above, you can ensure that your project runs smoothly and efficiently.
And remember, a smooth and efficient workflow doesn’t have to stop at production. You can sign up for a free WeVideo plan to ensure that your edits are seamless and free of hiccups, allowing your project to shine from start to finish.