Landscapes have been at the forefront of human-created art throughout every medium, whether it's John Constable's idyllic and cozy English countryside paintings or Ansel Adams' moody and larger-than-life panoramic views of America. The vastness and openness of a landscape resonate with all audiences, and the same is true for video.
.webp?width=650&height=334&name=image%201%20(18).webp)
Wivenhoe Park by John Constable
From sweeping aerial shots of the Great Plains to static, wide shots of a 14th-century castle, landscape shots are pivotal in setting the tone and establishing the location of a video. In this article, we’ll cover some of the core basics of landscape video shot's practical and theoretical elements.
When to use a landscape shot
First and foremost, when is it likely that one would use a shot of a landscape? Outside of travel vlogs and documentaries, a landscape shot is typically used for an establishing shot in narrative circumstances. In brief:
The establishing shot is one of the core foundations of visual storytelling. Typically, it is a long shot and often the first shot of a scene. It helps the audience understand where the following sequence will take place and the thematic elements they can expect from the scene.
As mentioned in our guide to establishing shots, an establishing shot can be a diner or a parked car on a street, but when it comes to landscape shots, they are just as instrumental as the characters themselves, especially in high fantasy and science fiction films, where the location is sometimes more important than the characters. Think of “The Lord of the Rings,” “Dune, and “Star Wars.” Greig Fraser's stunning landscape shots of Arrakis are vital to Dune, and the film wouldn't be the same without them.
.webp?width=1000&height=375&name=image%202%20(16).webp)
Dune 2. Image via Warner Brothers
Therefore, it's essential to recognize that landscape shots are not just about establishing the location of a scene; they can also help elevate your story and advance the plot.
Tips on filming landscapes?
With that said, what are some of the best ways to film landscapes? First, let’s look at how we can maximize our aperture settings to get the best results from filming a landscape shot.
Aperture and focus
Focus is one of the cinematographer's core tools for correctly framing a shot and directing the audience's gaze to where it needs to be. As explained in our cinematography guide, focus works in conjunction with a lens setting called aperture. A wide aperture produces a shallow depth of field, while a narrow aperture produces a deep depth of field.
Regarding landscape shots, you might gravitate towards using a narrow aperture to retain adequate focus through all focal planes. However, while this may seem the correct approach in theory, it has certain limitations.
At a smaller aperture, such as f/16, diffraction becomes more noticeable, especially on cheaper lenses. Finer details within the image also appear softer than a wider aperture.
Additionally, a narrow aperture reduces exposure. Therefore, if you're filming a moody hillside near dusk at f/16, you might risk underexposing your shot.
.webp?width=650&height=433&name=image%203%20(17).webp)
Image via Unsplash
In these instances, it’s also common to want to use infinity focus, a lens setting that sets the focus distance to infinity, which in practice should give equal focus to all focus planes within the image.
.webp?width=650&height=432&name=image%204%20(16).webp)
The infinity focus. Image via Wikipedia
However, using infinity focus can result in a lack of a clear focal point, leaving the audience unsure of where to direct their attention.
So, what should you do?
First, if the lens you're using has the potential to cause diffraction and softness at smaller apertures like f/16 or f/22, you'll want to step down to around f/8 to f/11. There’s a common misconception that your f-stop needs to be either wide open or narrow, but that’s not true. At f/11, there is a good balance between sharpness and depth of field.
The second thing to consider is what's called the hyperfocal distance. Hyperfocal distance is a focusing technique typically defined as the closest distance at which a lens can be focused while maintaining acceptably sharp elements throughout the composition.
When focusing at the hyperfocal distance, everything from half of that distance to infinity will be in acceptable focus. But isn’t this the same as focusing at infinity? Well, not quite. With infinity focus, the primary goal is to achieve sharpness at extremely distant objects, meaning foreground elements will likely fall out of focus. Conversely, focusing at the hyperfocal distance ensures that both foreground elements and distant objects remain in acceptable focus, maximizing the depth of field.
.webp?width=650&height=362&name=image%205%20(11).webp)
Image via Unsplash
This would be an example of correctly employing hyperfocal distance. See how the foreground is in focus, and the distant elements appear equally sharp.
So, how do we determine the hyperfocal distance? This is influenced by several factors, including your focal length, the f-stop you're using, and your sensor size. Thankfully, you don't need to be a math whiz to figure this out, as there are numerous online calculators available to help you determine the correct hyperfocal distance when the time comes.

Composition tips
When filming a landscape shot, the rule of thirds may come into practice more so than any other type of shot. If you're not sure what the rule of thirds is, imagine a 3x3 grid on your image, breaking it down into three vertical columns and three horizontal rows.
.webp?width=650&height=366&name=image%206%20(10).webp)
With this grid, you can position your camera and adjust your focal length to create visual harmony. For example, if a human subject is alone in the composition and walking towards the camera, the subject is likely to be placed in the center of a 3x3 grid.
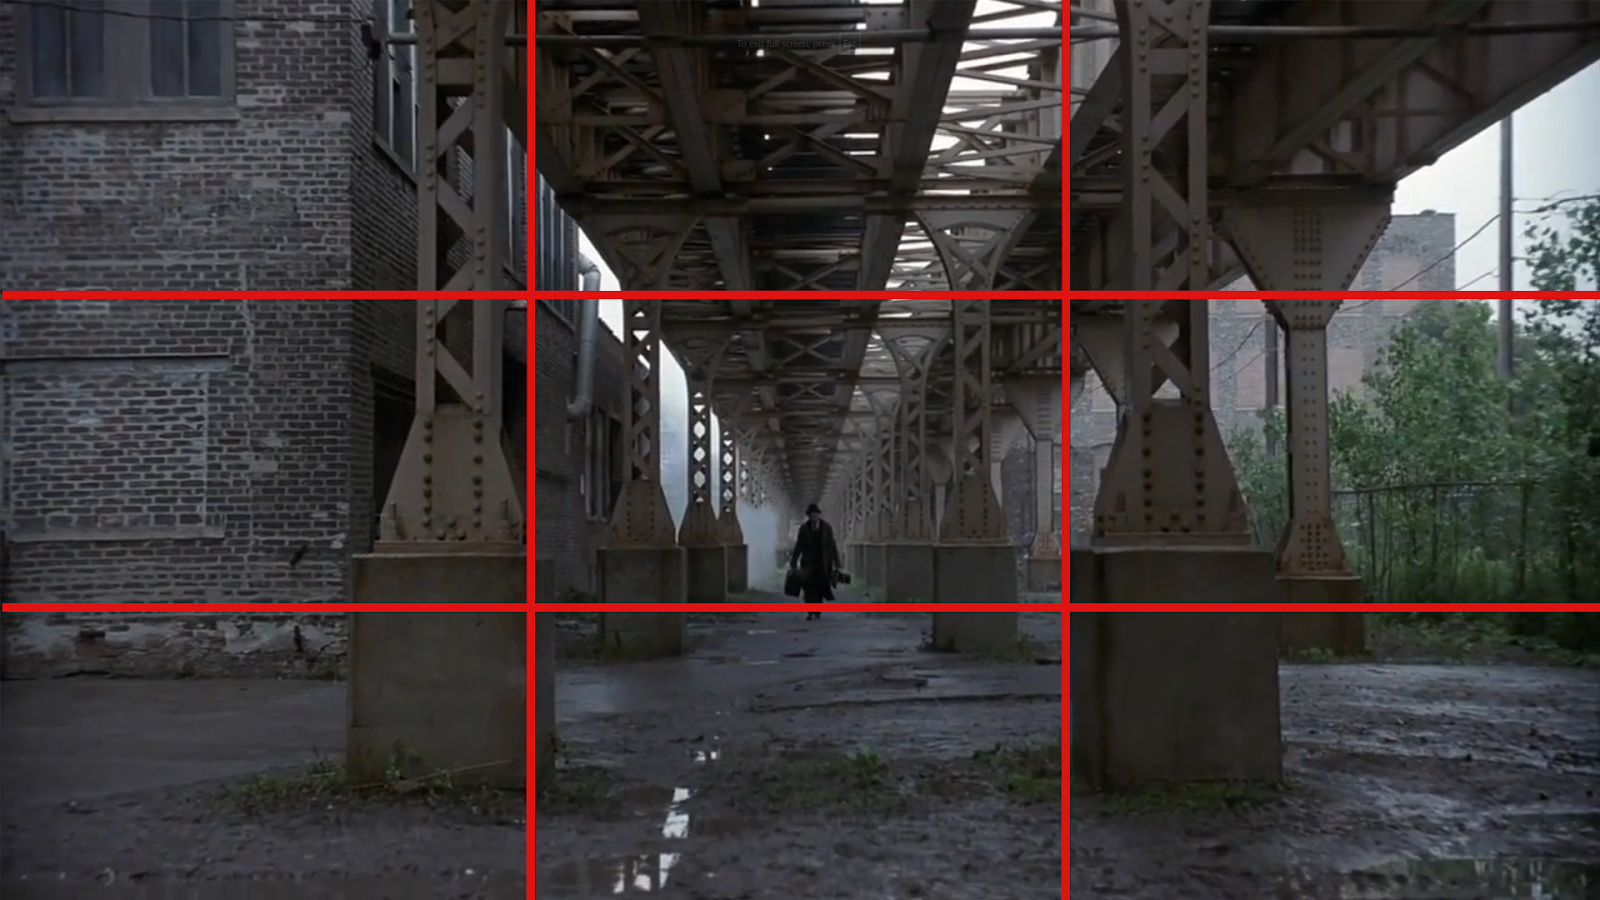
This is because it's visually balanced. If they were not placed in the center, even though it might not be our intention, we suggest to the audience that something is off balance.
When it comes to landscapes, using the 3x3 grid is a great way to harmonize your image. If you want your composition to be visually balanced, place the horizon in the center row, ensuring equal amounts of land and sky.
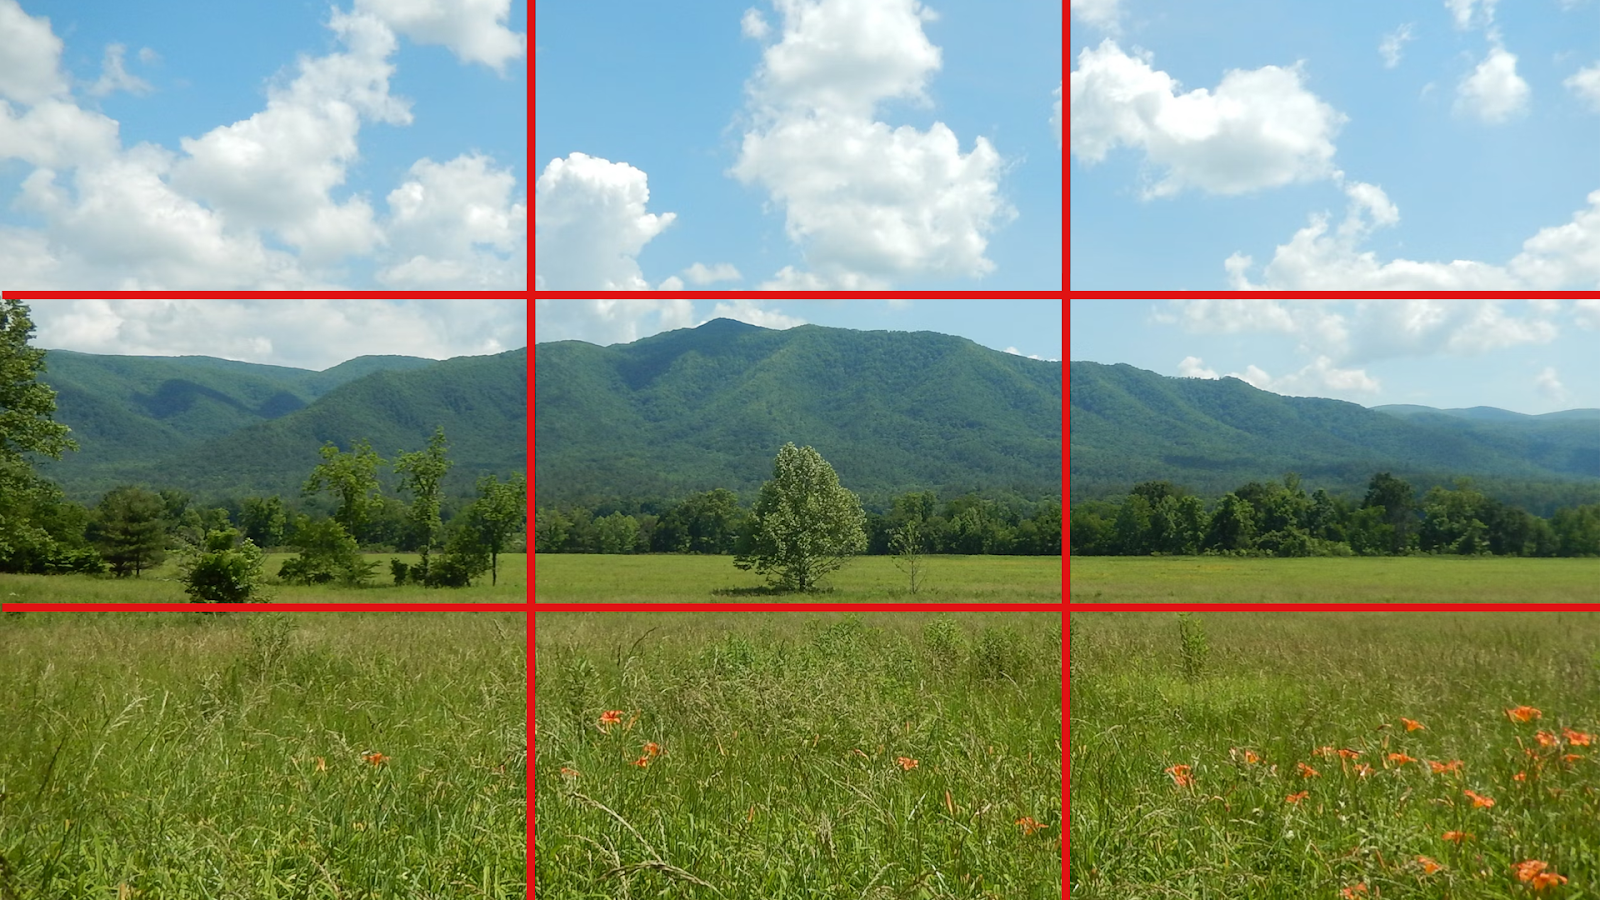
Image via Unsplash
In this image, using the rules of thirds, there are equal amounts of foreground, midground, and background, which we can also attribute to the land and sky.
However, if we place the horizon on the bottom line, more sky will fill the frame, which could symbolize openness, isolation, or how lost a character is.
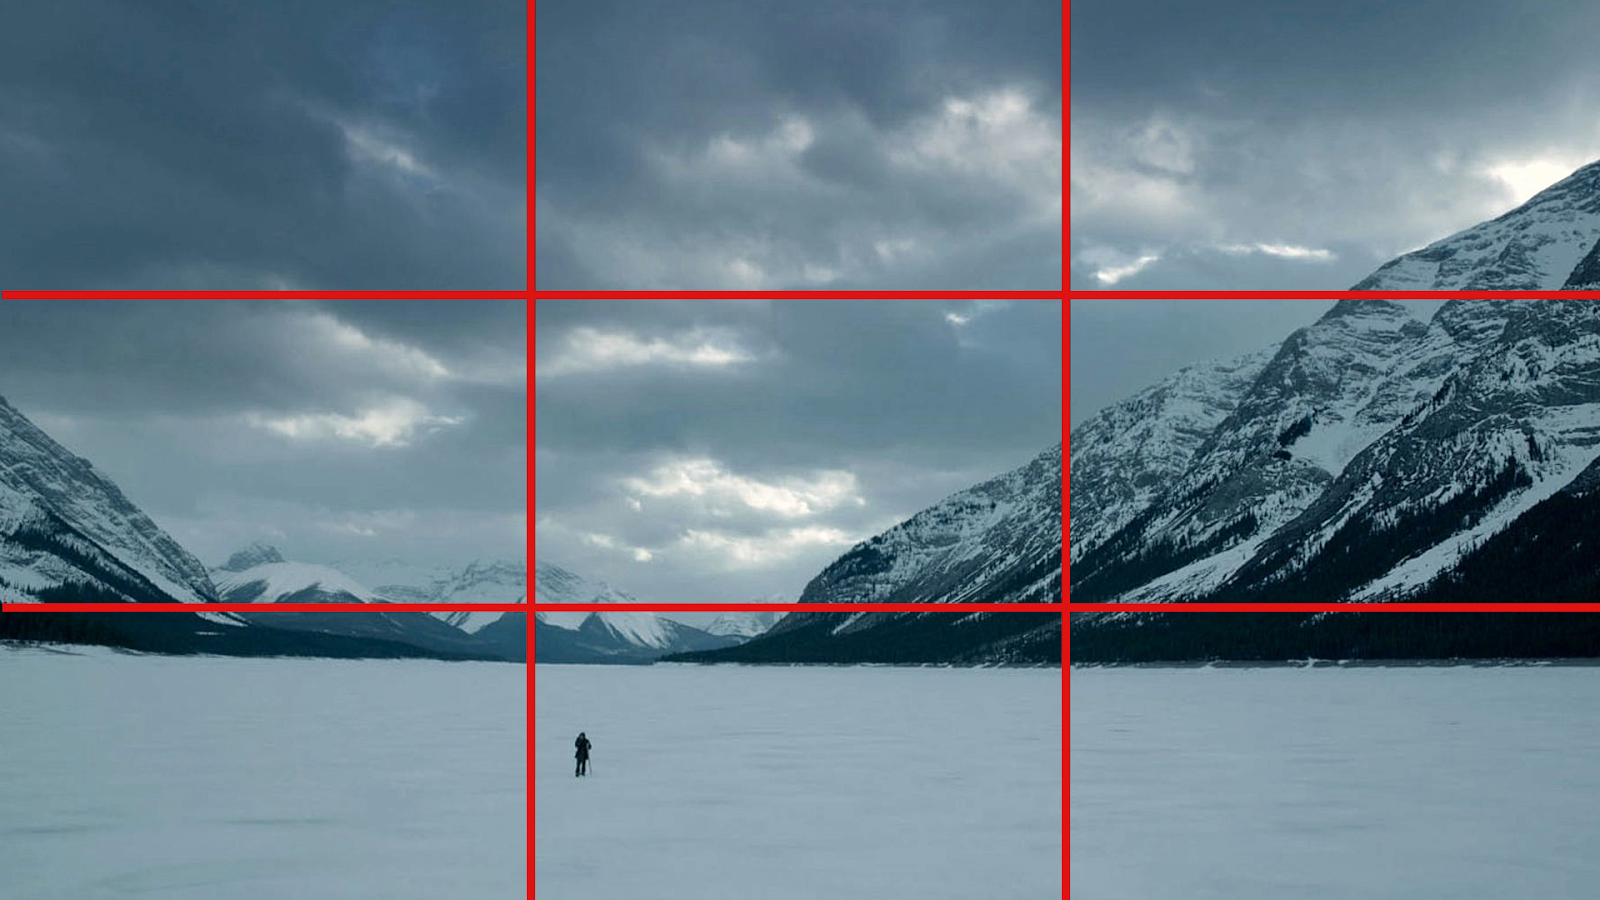
Image via 20th Century Studios
Conversely, if we position the horizon on the top line, we focus more on the land within the shot, which creates a sense of groundedness, stability, and dominance of the terrain.
.webp?width=650&height=366&name=image%2010%20(5).webp)
Image via Unsplash
Incorporate the concept of this grid when aligning your shots, and you’ll be surprised at just how significant the changes are. While in most circumstances, this will be a conceptual grid you will have to think about while setting up the camera, some models have a 3x3 grid built into the monitoring system, so you can view the footage while on location.
Equipment needed
Lenses
Let’s talk about lenses. It may seem appropriate to gravitate towards using your wide-angle lens. After all, with a wide-angle lens, you'll capture more scenery, providing a wider field of view. And when it comes to landscapes, you'll be able to capture more of the environment, seemingly ideal for the assignment, right?
.webp?width=650&height=433&name=image%2011%20(6).webp)
Image via Unsplash
However, while a wide-angle lens creates a broader field of view, it also minimizes and pushes back the elements in the distance. So, while you may technically capture more of the landscape, the elements within the scene can appear too small or too far away in the frame to be visually impactful, resulting in more emphasis on the foreground instead.
With a wide-angle filming a landscape, you might think your shot would look like this.
.webp?width=650&height=365&name=image%2012%20(6).webp)
But in fact, it would likely look like this:
.webp?width=650&height=365&name=image%2013%20(6).webp)
Therefore, we suggest using a standard focal length of 35mm onwards, depending on the type of scenery.
Alternatively, depending on the concept of the shot and the location, you might consider using a telephoto lens. If you have multiple hills in the distance or islands along a coastline, a telephoto lens can help compress the compositional elements together, creating an interesting layering of the landscape.
.webp?width=650&height=433&name=image%2014%20(3).webp)
Image via Unsplash
This photo was taken with a telephoto lens, which compresses the distant elements and makes the mountain peaks appear stacked, creating a distinctive layered effect.
Tripods
It goes without saying that a tripod is a necessity. While handheld cinematography has certainly become more popular over the last 15 to 20 years, thanks to feature films like “The Bourne” series or TV mockumentaries like “The Office” and “Parks and Recreation”, when it comes to a landscape shot, where the goal is to be wowed by the visual beauty of the scenery, you want the shot locked off. You want the viewer to take a moment, relax, and engage with the scenery.
.webp?width=650&height=277&name=image%2015%20(1).webp)
The Revenant. Image via 20th Century Studios
If we're shooting handheld and there's a visible camera shake, it almost instantly disengages the audience from the moment. Of course, if this is the intended effect, then proceed with it.
Now, if the idea of carrying a bulky and heavy tripod through the wilderness or countryside to capture your landscape shot sounds slightly tiresome, you should know that there are alternatives, such as a cine saddle.
A cine saddle is essentially a glorified beanbag, but they are lighter and smaller, allowing you to position your camera on various surfaces to achieve a level shot. If you're in a rocky environment, a cine saddle can be a pivotal tool for obtaining a static and level shot without needing a traditional tripod.
Getting more from your landscape shots
You might assume that filming a landscape shot involves finding a pretty composition, setting up your gear, and pressing record. And, well, you wouldn’t be wrong in most circumstances. However, there are situations where a landscape doesn’t have the ‘wow’ factor; something is missing. In these cases, you can lean on the following techniques to give your landscape more depth and visual interest.
Leading lines
Leading lines can be a great way to direct your audience's gaze in a landscape shot. Technically a photography technique, a leading line uses structures within your composition, such as a fence, a path, or a stream, to direct your viewer's gaze along the leading path to the horizon in the distance.
This here would be considered a leading line.
.webp?width=650&height=433&name=image%2016%20(1).webp)
Image via Unsplash
In photography, leading lines are often extremely distinct. However, in filmmaking, you would want to take a more subtle approach, going for the idea that in some shots, you might not even notice that a leading line has been used, but still, they are ever-present, guiding your eye.

Image via Unsplash
This is a great example of a subtle leading line. It doesn’t run straight through the center column, but instead, it directs our gaze all through the composition before resting on the castle in the background.
Golden Hour
Filmmaking is an unforgiving medium. There aren't many shortcuts to capture beautiful footage without following a methodical process; correctly framing the scene, lighting, choosing the right lens, movement, etc.
However, if there's one get-out-of-jail-free card that can guarantee beautiful footage no matter what, it's golden hour.
Golden hour occurs twice daily, once in the morning and again in the evening, and it’s during this period where the sky is washed with a golden glow. This effect happens because, as the sun lowers and aligns more closely with the Earth, its light must pass through a denser portion of the atmosphere.

Image via Unsplash
In doing so, shorter blue wavelengths scatter, allowing the warmer red and orange tones to take over, creating the signature golden hue.
From empty parking lots and clifftops to city bridges and abandoned towns, golden hour can transform any scene into visually stunning. If your location lacks natural cinematic appeal and you're struggling to capture a compelling landscape shot, filming during golden hour can be the perfect solution to elevate your visuals effortlessly.

Image via Unsplash
Landscape shots in WeVideo
As mentioned at the start of this article, beautiful landscape shots are an audience favorite. As, after all, many have never had the opportunity to experience these views personally. With nearly 7% of the world's population living in landlocked countries and about 57% living in urban environments, access to this type of scenery isn’t a given. While stunning landscapes can increase your production value, what do you do if you fall into this category and do not live somewhere that has beautiful landscape scenery?
Thankfully, the WeVideo editor has a built-in stock library, so if you cannot film landscape shots for your production, the wide range of video clips available should be enough to meet your needs.
To access a variety of landscape shots, simply go to the editor and select Videos. From there, you can search for landscape clips across different types of nature using the text field.
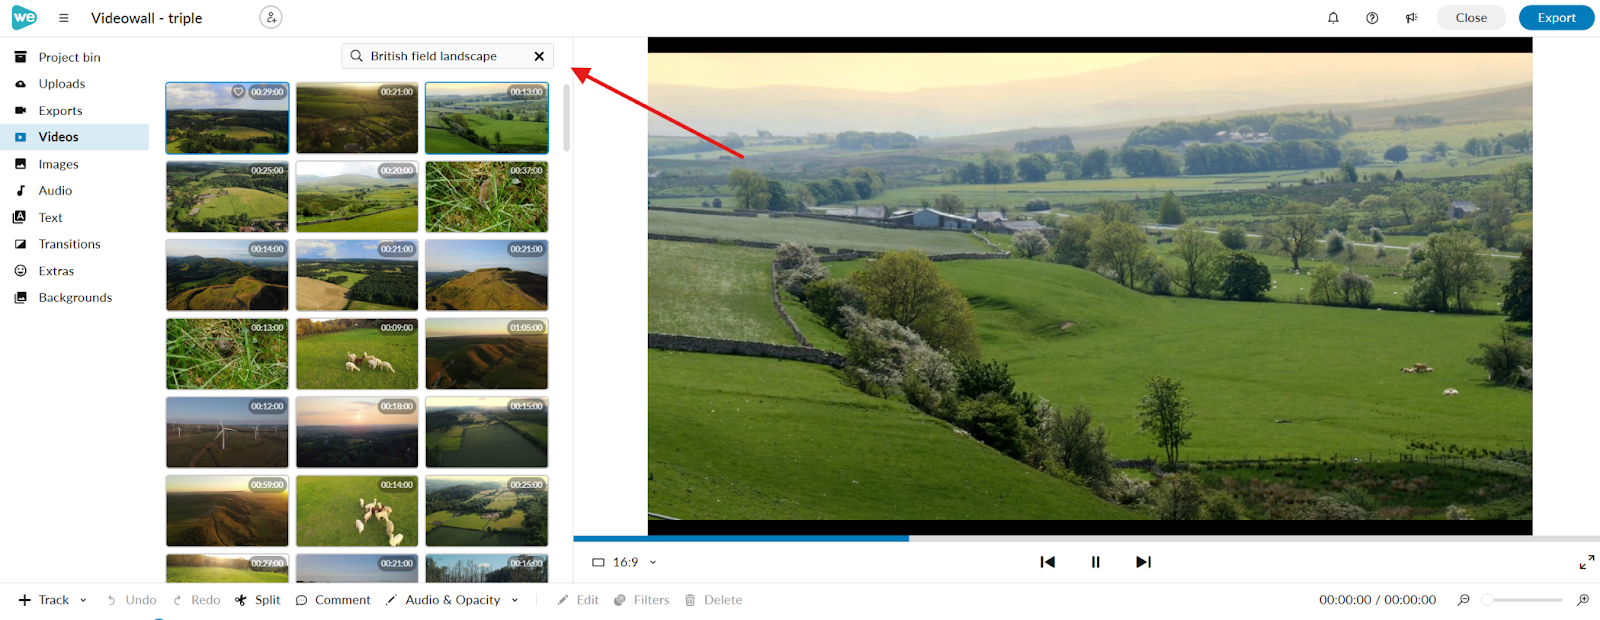
However, remember that “landscape” also refers to video orientation, meaning your search results might include clips that aren't specific to actual landscapes.
To ensure you find the right footage, be methodical with your search by including specific keywords that accurately describe the type of landscape you're looking for.
Final thoughts
So, there we have it, the core basics of landscape shots. Out of everything an aspiring filmmaker can capture, landscape shots are certainly among the easiest. However, achieving a beautiful landscape shot still requires intent and careful compositional framing.
For more inspiration on films with stunning landscapes, we recommend the following films:
- Lawrence of Arabia
- The Assassination of Jesse James by the Coward Robert Ford
- The Revenant
- Lord of The Rings Trilogy
- Tree of Life
- Once Upon a Time in The West
- Badlands
Once you've finished these, make sure to dive even deeper into our film school articles.