


For those unfamiliar with filmmaking, cut editing can often feel like a technical task rather than a creative one. After all, if you’ve got solid storyboards and shot lists prepared, isn't editing just a matter of placing shots in the correct order, deciding where they start and end, and cutting the unnecessary bits?
To an extent, that’s true. But there’s a lot more to editing than just cutting out the bad parts. This raises the question: what exactly is a "bad bit?" Outside of the clapperboard signaling the start of a scene and the director yelling "cut" at the end, everything in between is usually considered the “good bit.” Or at least, the producers hope so.
As the editor, your job is to ensure the scene flows naturally, feels engaging, and remains cohesive. That means carefully deciding when to cut based on who's speaking, the emotional weight of their words, and how the pacing shapes the audience's perception.
How you achieve that flow depends on the cuts you choose to make. The craft goes well beyond just placing two clips together. In this article, we'll explore the core principles of cut editing and the different cuts you can make to elevate your film or video project.
Standard edit
The standard edit is the most basic cut you can make in your editing software. It’s simply the act of placing two clips together. Even if you’re just dropping raw footage in sequence, technically, that’s an edit. However, there’s a skill to deciding when to cut.
The thing about editing is that knowing when to make a standard cut isn’t as straightforward as remembering to take the lens cap off before filming. It’s not a purely practical element—it’s almost subconscious, like how a guitarist knows which notes will work during an improvised solo based on what came before and what’s coming next.
Thankfully, veteran editor Walter Murch offers guidance in his book In The Blink of an Eye, which is a must-read for aspiring editors. In it, he outlines six essential principles to help determine the best moment for a standard cut.
Murch explains that cut editing should meet all six criteria at once:
- It stays true to the emotion of the moment.
- It moves the story forward.
- It occurs at a rhythmically interesting and "right" moment.
- It respects "eye-trace"—the audience's focus within the frame.
- It respects the two-dimensional plane of the screen (the grammar of three dimensions captured by a camera).
- It respects the three-dimensional space and the physical continuity of where characters are in relation to one another.
If the edit can't meet all six criteria simultaneously, Murch suggests prioritizing the cut by assigning weight to each principle, moving down the list when a particular principle cannot be achieved.
- Emotion — 51%
- Story — 23%
- Rhythm — 10%
- Eye-trace — 7%
- Two-dimensional plane — 5%
- Three-dimensional space — 4%
He explains: “At the top of the list is emotion — the thing that’s hardest to define and address, and often the last thing taught in film school. How do you want the audience to feel? If they are feeling what you want them to feel throughout the film, you’ve succeeded in one of the most important aspects of filmmaking. Ultimately, what people remember is not the editing, the camerawork, the performances, or even the story — it’s how the film made them feel.”
So, when making a standard cut, or any form of cut editing, always consider the emotional weight behind it. Does the edit help tell the story you’re trying to convey? If not, it might not be the right edit. Again, the book In The Blink of an Eye is highly recommended.
Some of the best examples of standard cuts can be seen in scenes with minimal action or camera angles, like the one in Michael Mann's “Heat” (1995).
There are no more than four shots throughout the entire six-minute sequence, which is solely a conversation between a detective and a criminal. With minimal action and limited camera angles, the sequence’s impact comes down to two things: the acting and the editing.
Cut explained: There are no notes for this technique. Simply place one media clip next to the other, and you have a standard edit. What media clip you place next to the previous clip makes the magic.
L-cut and J-cut
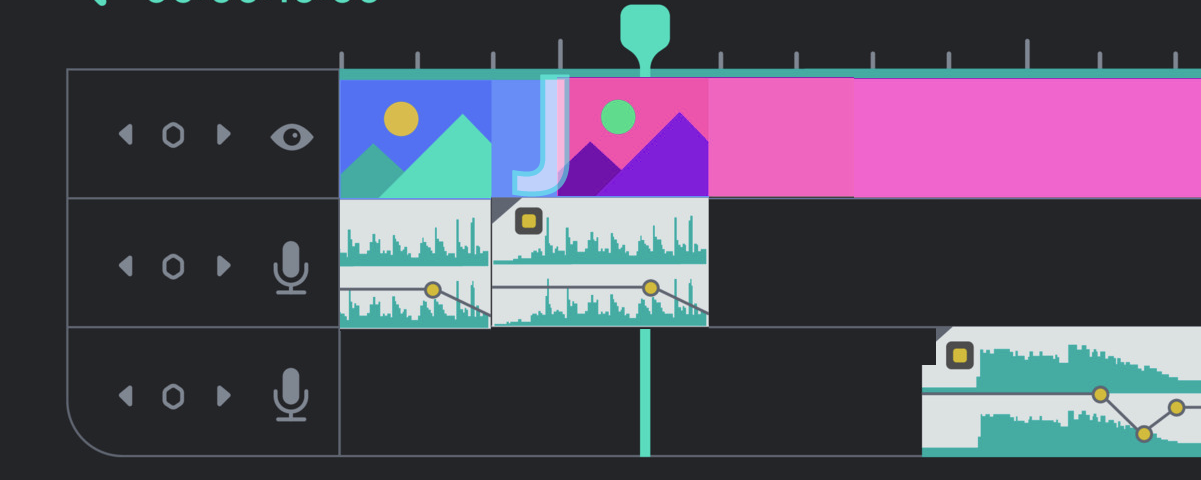
Throughout Murch’s book, he frequently emphasizes how emotion should drive your cut edits, and the L-cut and J-cut are excellent techniques for evoking emotion in your viewer. These cuts are named based on how the media clips appear on the timeline viewer after the edit. Typically, you have a video clip with synced audio beneath it. In an L-cut, the audio from Clip A continues playing as the video transitions to Clip B.
For example, here’s how an L-cut looks on the timeline, with an L placed over the cut for visibility.
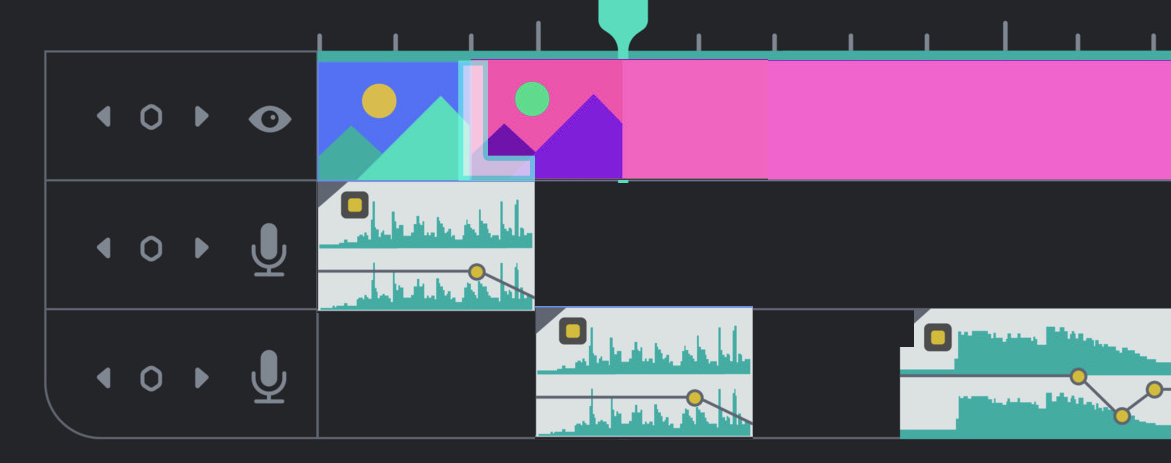
In contrast, with a J-cut, the audio from the upcoming scene enters early, so the audience hears the next scene before they see it visually.
These techniques are used for various reasons, often to aid in smooth transitions. A J-cut, for instance, can symbolize movement or the anticipation of what’s coming next. If two friends at a bar say, "Let's do this, let's go out, let's fly to Japan," the sound of an airplane could fade in during the bar scene to help transition smoothly into the following location. Additionally, a J-cut can stitch two scenes together when you need to linger on a shot, but the audio from the scene is hollow. For example, consider the sequence from Inception (starts at 00:54).
Ariadne enters her sleep stage, and the shot lingers for 6 seconds without any diegetic dialogue. Though 6 seconds seems brief, it can feel long without dialogue in the film. The editor uses a J-cut to maintain momentum, bringing the audio from the following scene early, creating a seamless flow to the next moment.
On the other hand, an L-cut is often used for emotional resonance. For instance, if a character recalls a lost loved one, you could show the memory on screen and then cut back to the present while the audio of those cherished moments bleeds into the present-day scene. This creates a lingering effect, as though the memory is still alive.
An L-cut can also blend action between shots. It doesn't always have to be used between separate scenes.
For example, in the shot below from “The Lord of the Rings: The Fellowship of the Ring” (2001), the character Boromir yells for Aragorn to retreat. An L-cut is applied to enhance the sense of three-dimensional space.
This allows the audio from Boromir's scene to carry over into Aragorn's angle, seamlessly connecting the two shots and enhancing the continuity of the action.
When working with a single camera, which also captures single audio tracks for your scene, L-cuts, and J-cuts become crucial for building an immersive experience. In real life, overlapping moments and sounds coming from out of view are common. Mastering L-cuts and J-cuts helps replicate that natural flow.
 Cut explained: To create an L-Cut, place two clips side by side, unlink the audio from the first clip, and extend it beneath the second clip. For a J-Cut, unlink the audio from the second clip and bring it forward under the first clip.
Jump cuts
A jump cut isn’t often seen in narrative filmmaking because it blatantly calls attention to the edit itself. In theory, editing should remain invisible (usually called invisible art), with seamless transitions that don’t break immersion.
A jump cut disrupts this by breaking a single, continuous shot into two parts. For example, if we have a static shot of a man sitting at a bus stop, and he gets up and then moves to the other side of the waiting bench, we edit out the movement of the man getting up. Visually, we would see the man teleport from one side of the screen to the other. Even if we switched camera angles to a later moment within the scene to when he moved, the edit wouldn’t look so jarring, even though continuity would be off.
For example, let’s turn again to The Lord of the Rings, this time to The Return of the King (2003).
At 1:00, the Witch-king of Angmar turns back to Gandalf after hearing the horn and then flees. However, at 1:02, there is a jump cut where the Witch-king abruptly takes off. The edit name comes from the elements in the frame to “jump” abruptly, making the edit noticeable.
This is not to say it’s never used in film; when it is, it’s usually done stylistically. In this sequence from Hot Fuzz, the editing is fast and energetic. At the end of the sequence, when the filmmakers wanted to show a lapse of time while waiting for the train, they used a jump cut. We go from broad daylight to early evening. If they had used a classic dissolve, it would have disrupted the flow of the edit. Simply switching to a different camera angle would have confused the audience.
Instead, the jump cut does the job perfectly here, keeping the rhythm intact.
While the jump cut is still used sparingly in narrative films and television, it has become commonplace for modern-day social media content. With the rise of YouTube vlogs throughout the 2010s, jump cuts were introduced for hosting and vlogging. Instead of redoing a take to make everything fluid in one go, like a news announcer, YouTubers would simply cut out pauses and stutters and jump ahead. As a result, the jump cut became popularized and normalized in modern-day social media content.
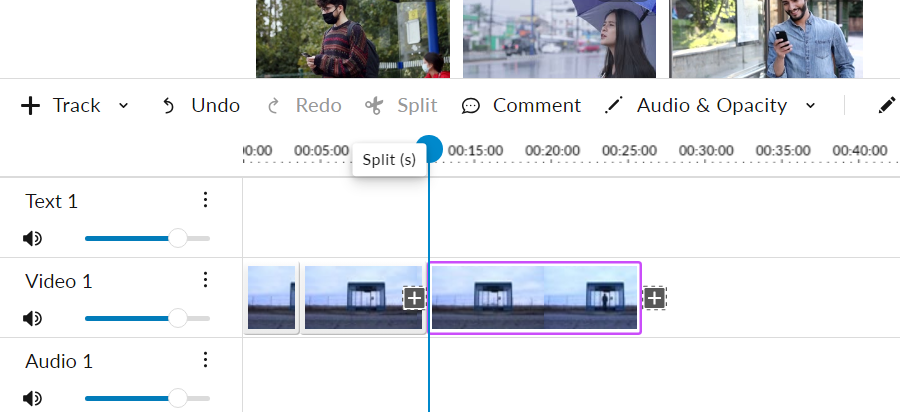
Cut explained: Insert the media clip into the Timeline Viewer and use the Split tool to cut out the mid-section. Delete the middle portion. For a more substantial effect, select a clip with a noticeable change in the time of day or the character’s movement between the beginning and end of the cut.Cuts like these can be performed with ease using the WeVideo editor. With intuitive keyboard shortcuts, such as "S" for Split, jump cuts can be created instantly. Sign up for a free plan to try it out.
Cutting on action
Filmmaking, by all accounts, is hard. It’s not for the faint of heart. There’s a reason why many films, even with talented people and multi-million dollar budgets, still fail. Sometimes, the pieces just don’t click — there are so many moving parts at every stage of the process. One of the biggest offenders is when a film doesn’t have rhythm. It feels static like there’s no motion.
Cutting on action is one way editors can ensure fluidity throughout the edit. This technique involves cut editing through the movement of a character or an object across two different shots. For example, if a character bends down to pick up a basketball in a close-up shot, and then we cut to a long shot, we want the character to be in the same position as they start to stand up in the close-up. That way, when they stand up, it feels like one smooth, continuous motion. Cutting on action creates a sense of rhythm and organic movement within the scene.
For instance, in this scene from “The Last Samurai” starting at 00:30, there are 11 cuts within just 9 seconds. Each cut seamlessly follows the action from the previous shot, enhancing the fluidity and motion of the training sticks throughout the scene.
You don’t have to do this for every shot, but you’ll find that the film feels more alive when you follow this process. It also helps to tie up continuity issues that might come up during production. When the cameras finally roll, there are times when the same scene needs to be shot over several days or even weeks. Or maybe it’s shot in one day, but lighting conditions keep changing, making continuity a nightmare. Cutting on action can help stitch those different shots together.
Even if the shots were filmed on completely different days, editing on action creates the illusion of seamless movement, immersing the viewer in the scene.
Cut explained: Identify the movement similarities between the two clips. Cut and nudge the clips in the timeline until the transition feels seamless.
The cuts mentioned above are mainly achieved by manipulating media directly in the editing software. However, other instrumental cuts come from the media used next in the edit sequence. Let’s take a look at those.
Match cut
A match cut is an edit that uses elements from one shot to seamlessly transition into the next, creating a conscious connection between the two. There are a few different ways to use a match cut — it could be through action, sound, color, or even the ‘idea’ of the scene.
In the example below from “Grease” (1978), Danny and his gang are in a fantasy sequence, imagining they are rock-and-rollers after fixing up the hot rod. At the end of the sequence, a match cut brings the gang back to reality. This cut effectively jolts the viewer with contrasting visual information.
However, the most common approach is to align the composition between two shots. This is where one shape in the shot lines up perfectly with a similar object or shape in the next, often from a completely different scene. It’s used to create juxtaposition and evoke emotion from the audience.
Probably the most overused example — but it’s overused for a reason — is from “2001: A Space Odyssey”. We see the primates throw a bone into the air, and as the bone is falling, there’s a match cut to a satellite in space, symbolizing the direct evolution of humanity between those two time periods.
Match cuts can work because they create a seamless visual and thematic connection between two scenes, allowing the audience to draw subconscious links between them. However, like a jump cut, a match cut does call attention to the edit and can pull the viewer away from the immersion if not employed correctly. Therefore, be disciplined when using them. You are effectively telling the viewer, ‘Think about why I made that cut.’
Cut explained: Align the action, sound, color, camera direction, or composition between two shots to evoke audience emotion. If aligning the composition, adjust the second shot's X-axis, Y-axis, or zoom to maintain visual symmetry.
Cross cuts
Cross-cutting is a more subtle technique that alternates between two scenes simultaneously. Though not particularly complex, it’s crucial for building dramatic tension. A great example is in “The Bourne Identity” and its sequels, where the CIA is tracking Jason Bourne while he’s trying to evade them. These scenes often occur in entirely different countries, so it wouldn’t make sense to show Bourne’s entire escape before cutting back to the CIA’s pursuit. Instead, cross-cutting allows the audience to follow both actions at once and ramps up the suspense.
Cross-cutting rules aren’t set in stone — just like most filmmaking rules — but they help speed up the narrative without visually speeding up the film. For example, in the scene mentioned, the shot of Nikki getting onto the tram lasts for less than twenty-four frames before it cuts to the chaotic CIA surveillance office, where an agent mentions Nikki getting on the tram. In the office, multiple monitors offer more visual information about the situation than we would’ve gotten just by sticking with Nikki. This also introduces a bit of office tension.
If we had stayed with Nikki stepping onto the tram for several seconds or more, it would’ve slowed the tension and reduced the visual information for the audience. Much like writing, filmmaking uses the principle of ‘show, don’t tell.’
When cross-cutting, a good approach is first editing each sequence in linear order. From there, you can pinpoint key timing elements to transition between the scenes. The script supervisor often indicates these moments in the script, making sure the cuts happen at just the right moments to keep the flow intact.
Cut explained: Build out both scenes before editing. Then, cut between simultaneous actions in both scenes. Use the opportunity to jump forward in time where applicable.
Montage
Ah, the montage. Is there anything more classic than a film montage set to an 80s rock ballad?
In case you didn’t catch it, a montage is an editing technique where a series of shots are condensed to show the passage of time.
There aren’t really any strict rules about how a montage should be edited, but the basic idea is to condense a chunk of time in the story down to just a few minutes on screen. Since film and TV unfold in real-time, it can be tricky to show that time has passed without using text like "two months later," which often feels like a lazy shortcut. Instead, filmmakers turn to the montage sequence.
So, how do you edit a montage? Luckily for editors, this is one of those techniques where the production team’s planning and preparation play a more prominent role than the editor’s direct input. It usually involves a mix of different shots in various locations, with costume changes to show the passing of time and movement between places. You see it often when a character trains for something big or learns new skills to defeat an enemy.
However, music is crucial in setting the tone of the montage, as it can turn a simple sequence into a powerful storytelling tool. A core montage tip is to ensure that there is a staple sequence that serves as the backbone of the edit. This can be a sequence you continuously cut back to after showing progression in other scenes. In the case of “Rocky” (1976), it’s Rocky running through the streets of Philadelphia.
A montage can also be more subtle. In the sequence below from “Batman Begins” (2005), we see Bruce Wayne training on a frozen glacier. This is the backbone of the montage, interwoven with three other sequences of Bruce training and learning the ways of the ninja.
By all accounts, it’s a very subdued version of a montage, but it still elicits the primary functions of a montage: showing subject growth over time, condensed into a few minutes.
Here’s a short list of films with notable montages, and well, there’s certainly a theme between them.
- Rocky (1976)
- Kill Bill: Vol. 1 (2003)
- Scarface (1983)
- Mulan (1998)
- Rocky IV (1985)
- Creed (2015)
Cut explained: Place a series of clips in sequence to show the passage of time or character growth.
Cutaways
A cutaway shot is the secret ingredient to ensuring that the viewer gets all the visual information they need while also helping to avoid forced exposition in the story. Exposition, by the way, is relative information to help develop the plot and characters. When exposition is continuously delivered through dialogue, it can often leave distaste for the audience.
Cutaways are simply insert shots that move away from the main action of a scene to add extra visual context.
For example, imagine a detective and an informant discussing a potential suspect at a diner. The informant hands over some evidence. Instead of having the detective say, "Oh, this is Blake. I can't believe we finally have him," we could cut away to a photo showing Blake, the suspect, in action. This reduces the amount of verbal exposition and follows the tried and tested principle of "show, don't tell."
As an editor, it’s worth noting that it is on the production team to supply you with cutaway material. If the team did not film any inserts, and using stock footage would not be appropriate, a cutaway cannot be made.
In the example above from Se7en (1995), numerous cutaways illustrate what the two detectives are searching for. Without these cutaways, the information would have to be conveyed solely through auditory means, which would cheapen the impact.
Cut explained: When visual information can enhance a scene, use a cutaway to show it rather than having a character explain it.
While the practice of cut editing may seem straightforward, it is a craft that requires significant practice. The importance of an editor to a film cannot be overstated. Even the best novelists in the world still rely on editors. The magic of editing lies in how you choose to piece moments together, not merely in removing the "bad bits."
For your final bit of homework, we leave you with a video to see just how Star Wars was saved in the edit.
For more on filmmaking, visit our film school section on the blog.